In today’s fast-paced restaurant industry, maintaining precise control over temperature is crucial for ensuring the quality and safety of your ingredients. Atosa commercial refrigerators equipped with Dixell controllers offer advanced temperature management features that empower you to keep your ingredients in their optimal condition.
In this guide, we will walk you through the essential steps for setting and controlling temperatures using the Dixell controllers on your Atosa commercial refrigerators and freezers. Whether you’re a seasoned chef or a restaurant owner, mastering these controls will help you enhance the efficiency and performance of your refrigeration units. Let’s begin.
Please note that your new food equipment has been calibrated, configured, and tested at the factory. If you wish to adjust these settings, we recommend consulting your dealer to ensure that any changes do not compromise your warranty.
Setting Temperature on Commercial Freezers or Fridges with Dixell Controllers
Static temperatures are the simplest way to ensure your fridges or freezers provide predictable cooling. You can set a static temperature in the following way:
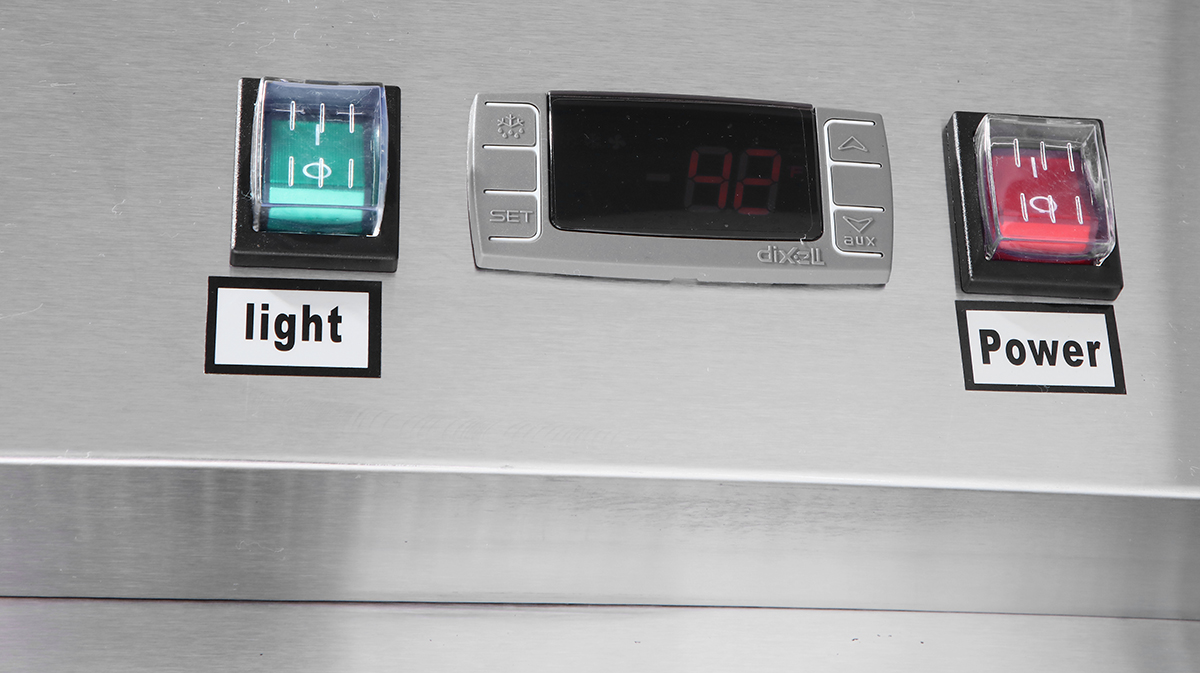
- Press the SET button and hold it until the temperature value starts blinking.
- Use the UP or DOWN arrow buttons to increase or decrease the temperature to the desired number.
- Press the SET button again to finalize your decision and lock in the temperature.
Setting the Temperature Difference With the “OT” Function
The “OT” function on the Dixell controller allows you to set a temperature difference between the outside and inside reader. For example, if you place your temperature difference to two, and the temperature reader shows 38 degrees, the inside temperature will be 36 degrees.
- Press and hold the DOWN arrow and the SET button simultaneously.
- Once this process starts, the monitor should read “nP”, but you must keep holding these buttons until the reading changes to “L2”.
- Once you release, the monitor should read “HY”; do not panic. This reading is correct.
- Press the UP arrow button until you see “OT” on the screen.
- Press SET, and you should see a number. This number is the current temperature difference. The default is 0.
- Use the UP or DOWN arrow buttons to increase or decrease the temperature difference to the desired number.
- Press SET, and the monitor will flash and return you to the home screen.
- Let the device idle, and it should return its temperature reading screen.
Setting the Low Setting on Your Atosa Fridge, Freezer, or Cooler
The low setting specifies the lowest temperature the fridge is allowed to reach.
- Press and hold the DOWN arrow and the SET button simultaneously.
- Once this process starts, the monitor should read “nP”, but you must keep holding these buttons until the reading changes to “L2”.
- Once you release, the monitor should read “HY”, do not panic-this is correct.
- Press the UP arrow button until you see “L2” on the screen.
- Press SET, and you should see a number–the current lowest temperature setting.
- Use the UP or DOWN arrow buttons to increase or decrease the low temperature to the desired number.
- Press SET, and the monitor will flash and return you to the home screen.
- Let the device idle, and it should return its temperature reading screen.
Setting the High Setting on Your Atosa Fridge, Freezer, or Cooler
The high setting specifies the maximum temperature the unit may reach and when the unit’s cooling will activate.
- Press and hold the DOWN arrow and the SET button simultaneously.
- Once this process starts, the monitor should read “nP”, but you must keep holding these buttons until the reading changes to “L2”.
- Once you release, the monitor should read “HY”, do not panic; this is correct.
- Press the UP arrow button until you see “US” on the screen.
- Press SET, and you should see a number. This number is the current highest temperature setting.
- Use the UP or DOWN arrow buttons to increase or decrease the high temperature to the desired setting.
- Press SET, and the monitor will flash and return you to the home screen.
- Let the device idle, and it should return its temperature reading screen.
Setting Your Atosa Unit’s Fan Control
You can control your unit’s fans for better control over the evaporator and condenser. However, this segment will only show how to keep the evaporator running even during defrosting.
- Press and hold the DOWN arrow and the SET button together.
- Once this process starts, the monitor should read “nP”, but you must keep holding these buttons until the reading changes to “L2”.
- Once you release, the monitor should read “HY”, do not panic; this is correct.
- Press the UP arrow button until you see “FC” on the screen.
- Press SET and the monitor should read “CY”.
- Press the UP arrow key, and the monitor should read “OY”.
- Press SET, and the monitor will flash and return you to the home screen.
- Let the device idle, and it should return to its temperature reading screen.
Bonus Tip: Manual Defrosting of Your Atosa Fridge or Freezer
You can manually defrost your appliance by pressing and holding the DOWN arrow button for at least three seconds.
Purchase All Your Commercial Kitchen Equipment From The FED (Foodservice Equipment Depot)
Explore our diverse selection of high-quality commercial kitchen equipment for all your culinary needs. Enjoy a seamless online ordering experience, ensuring fast and frictionless access to professional-grade food service equipment. Shop at our Restaurant Supply Online Store.